1.1 Arduino Basics
What is Arduino?
Arduino is an open-source electronics platform based on easy-to-use hardware and software. It takes the messy details of microcontroller programming and wrap it up in an easy-to-use package. Arduino framework also simplifies the process of working with microcontrollers with build-in libraries.
The language is based on C and can be expanded through C++ libraries.
Commonly Used Arduino Functions
These functions are included with Arduino IDE to be used with the Arduino environment.
pinMode(pin,mode)
Sets a pin as an input or output
digitalWrite(pin, value)
Sets a digital output pin to HIGH or LOW
digitalRead(pin)
Reads a digital input pin as HIGH or LOW
analogWrite(pin, value)
Sets an analog output pin to a value 0-1023
analogRead(pin)
Reads an analog output pin as a value 0-1023
delay(milliseconds)
Pauses the program for a certain amount of time
Serial.begin(value)
Begins the Serial Monitor with a baud rate of value
Serial.print(value)
Prints the value (variable) to the Serial Monitor.
Example program for ESP32 using Arduino IDE
First, connect ESP32 Development Kit to PC and setup Arduino IDE for ESP32.
Setup ESP32 Add-on in Arduino IDE
To install the ESP32 board in your Arduino IDE, please install Arduino IDE first and then follow the next instructions:
1. In your Arduino IDE 2, go to File > Preferences.

2. Copy and paste the following line to the Additional Boards Manager URLs field.

Note: if you already have the ESP8266 boards URL, you can separate the URLs with a comma, as follows:
3. Open the Boards Manager. You can go to Tools > Board > Boards Manager… or you can simply click the Boards Manager icon in the left-side corner.

4. Search for ESP32 and press the install button for esp32 by Espressif Systems version 3.X.

That’s it. It should be installed after a few seconds.
5. Uploading the Sketch
Select your board before uploading the code. On the top drop-down menu, click on “Select other board and port…“

A new window, as shown below, will open. Search for your ESP32 board model.

Select the ESP32 board model you’re using, and the COM port. Click OK when you’re done.
Now, you just need to click on the Upload button to upload a sketch to your ESP32.
![]()
After a few seconds, the upload should be complete.

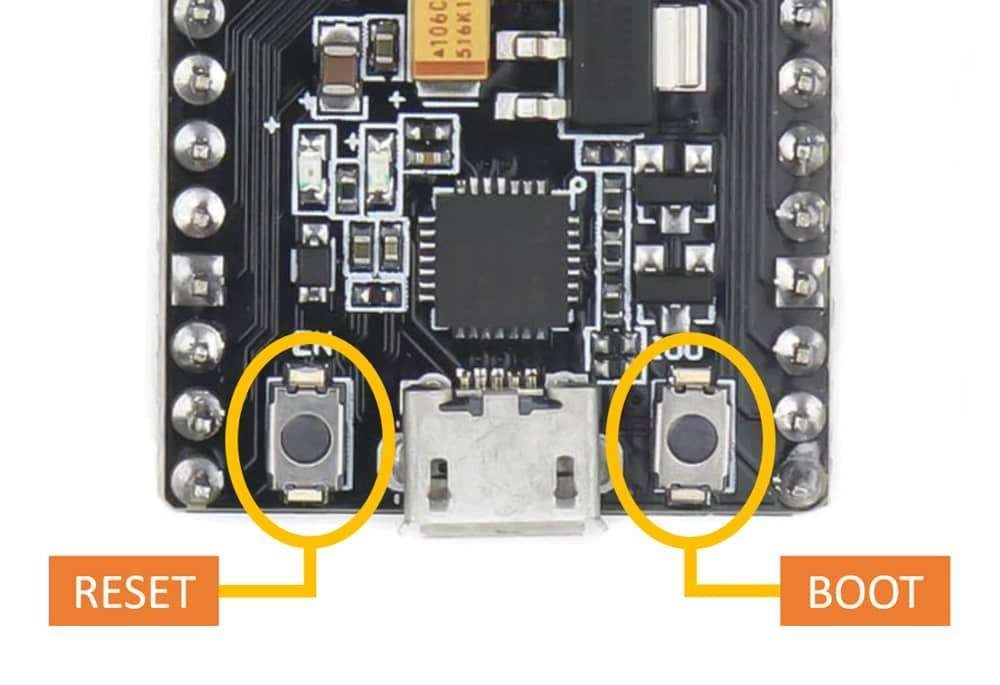
Note: some ESP32 development boards don’t go into flashing/uploading mode automatically when uploading a new code and you’ll see a lot of dots on the debugging window followed by an error message. If that’s the case, you need to press the ESP32 BOOT button when you start seeing the dots on the debugging window.
6. Serial Monitor
You can click on the Serial Monitor icon to open the Serial Monitor tab. Make sure you select the 115200 baud rate.

That’s it! You’ve installed the ESP32 Boards successfully in Arduino IDE 2.
Then, write a simple sketch for serial communication print in Arduino IDE as follows.
Upload the code using the upload button.
Note: Before uploading the code make sure the ESP32 board is in boot mode, to enter in boot mode press the boot button then press the reset button then release the reset button and then release the boot button, your board will go in boot mode.
Last updated