Now, let's create our own launch file and load our own .rviz file as well.
Add RViz Configuration File
Although is possible to use RViz with command like this, it's not the most convenient way, as we can move all these tasks into a ROS launch file with loading a .rviz file. Let's add the RViz configuration file first and then use it in our launch file.
cd ~/ros2_ws/src/mec_mobile/mec_mobile_description/
mkdir rviz && cd rviz
Create a file inside rviz folder and name it with mec_mobile_description.rviz
Note that we don't need to understand all the details of this configuration file. It can be generated automatically through RViz.
The RViz configuration files set up an RViz with a grid, a robot model, and coordinate frame visualizations etc. It also enables the camera movement tool and sets the initial camera view to an orbit view, which allows orbiting around a focal point in the scene.
When RViz is launched with this configuration file, it will display the robot model and allow interaction and visualization of the robot.
Launch file based on urdf-tutorial
Let's create the check_urdf.launch.py file in the launch folder inside mec_mobile_description:
cd ~/ros2_ws/src/mec_mobile/mec_mobile_description/
mkdir launch && cd launch
check_urdf.launch.py
import os
from launch import LaunchDescription
from launch.actions import DeclareLaunchArgument, IncludeLaunchDescription
from launch.substitutions import LaunchConfiguration, PathJoinSubstitution
from launch_ros.substitutions import FindPackageShare
def generate_launch_description():
# Set urdf package path, replace it with your package
pkg_urdf_path = FindPackageShare('mec_mobile_description')
default_rviz_config_path = PathJoinSubstitution([pkg_urdf_path, 'rviz', 'mec_mobile_description.rviz'])
# Show joint state publisher GUI for joints
gui_arg = DeclareLaunchArgument(name='gui', default_value='true', choices=['true', 'false'],
description='Flag to enable joint_state_publisher_gui')
# RViz config file path
rviz_arg = DeclareLaunchArgument(name='rvizconfig', default_value=default_rviz_config_path,
description='Absolute path to rviz config file')
# URDF model path within your package
model_arg = DeclareLaunchArgument(
'model', default_value='robot_3d.urdf.xacro',
description='Name of the URDF description to load'
)
# Use built-in ROS2 URDF launch package with our own arguments
urdf = IncludeLaunchDescription(
PathJoinSubstitution([FindPackageShare('urdf_launch'), 'launch', 'display.launch.py']),
launch_arguments={
'urdf_package': 'mec_mobile_description',
'urdf_package_path': PathJoinSubstitution(['urdf','robots', LaunchConfiguration('model')]),
'rviz_config': LaunchConfiguration('rvizconfig'),
'jsp_gui': LaunchConfiguration('gui')}.items()
)
launchDescriptionObject = LaunchDescription()
launchDescriptionObject.add_action(gui_arg)
launchDescriptionObject.add_action(rviz_arg)
launchDescriptionObject.add_action(model_arg)
launchDescriptionObject.add_action(urdf)
return launchDescriptionObject
This launch file is very useful to visualize our URDF during development. Now add the launch to the CMakeLists.txt file and build the workspace to try it:
Open a terminal window, and move to the mobile robot directory.
cd ~/ros2_ws/src/mec_mobile/mec_mobile_description/
mkdir launch && cd launch
Add a file with VS Code in the launch folder named robot_state_publisher.launch.py (with robot state and joint state publisher nodes more than the previous check_urdf.launch.py):
robot_state_publisher.launch.py
# This file launches the robot state publisher, joint state publisher,
# and RViz2 for visualizing the robot.
from launch import LaunchDescription
from launch.actions import DeclareLaunchArgument
from launch.conditions import IfCondition, UnlessCondition
from launch.substitutions import Command, LaunchConfiguration, PathJoinSubstitution
from launch_ros.actions import Node
from launch_ros.parameter_descriptions import ParameterValue
from launch_ros.substitutions import FindPackageShare
# Define the arguments for the XACRO file
ARGUMENTS = [
DeclareLaunchArgument('prefix', default_value='',
description='Prefix for robot joints and links'),
DeclareLaunchArgument('use_gazebo', default_value='false',
choices=['true', 'false'],
description='Whether to use Gazebo simulation')
]
def generate_launch_description():
# Define filenames
urdf_package = 'mec_mobile_description'
urdf_filename = 'robot_3d.urdf.xacro'
rviz_config_filename = 'mec_mobile_description.rviz'
# Set paths to important files
pkg_share_description = FindPackageShare(urdf_package)
default_urdf_model_path = PathJoinSubstitution(
[pkg_share_description, 'urdf', 'robots', urdf_filename])
default_rviz_config_path = PathJoinSubstitution(
[pkg_share_description, 'rviz', rviz_config_filename])
# Launch configuration variables
jsp_gui = LaunchConfiguration('jsp_gui')
rviz_config_file = LaunchConfiguration('rviz_config_file')
urdf_model = LaunchConfiguration('urdf_model')
use_rviz = LaunchConfiguration('use_rviz')
use_sim_time = LaunchConfiguration('use_sim_time')
# Declare the launch arguments
declare_jsp_gui_cmd = DeclareLaunchArgument(
name='jsp_gui',
default_value='true',
choices=['true', 'false'],
description='Flag to enable joint_state_publisher_gui')
declare_rviz_config_file_cmd = DeclareLaunchArgument(
name='rviz_config_file',
default_value=default_rviz_config_path,
description='Full path to the RVIZ config file to use')
declare_urdf_model_path_cmd = DeclareLaunchArgument(
name='urdf_model',
default_value=default_urdf_model_path,
description='Absolute path to robot urdf file')
declare_use_rviz_cmd = DeclareLaunchArgument(
name='use_rviz',
default_value='true',
description='Whether to start RVIZ')
declare_use_sim_time_cmd = DeclareLaunchArgument(
name='use_sim_time',
default_value='false',
description='Use simulation (Gazebo) clock if true')
robot_description_content = ParameterValue(Command([
'xacro', ' ', urdf_model, ' ',
'prefix:=', LaunchConfiguration('prefix'), ' ',
'use_gazebo:=', LaunchConfiguration('use_gazebo')
]), value_type=str)
# Subscribe to the joint states of the robot, and publish the 3D pose of each link.
start_robot_state_publisher_cmd = Node(
package='robot_state_publisher',
executable='robot_state_publisher',
name='robot_state_publisher',
output='screen',
parameters=[{
'use_sim_time': use_sim_time,
'robot_description': robot_description_content}])
# Publish the joint state values for the non-fixed joints in the URDF file.
start_joint_state_publisher_cmd = Node(
package='joint_state_publisher',
executable='joint_state_publisher',
name='joint_state_publisher',
parameters=[{'use_sim_time': use_sim_time}],
condition=UnlessCondition(jsp_gui))
# Depending on gui parameter, either launch joint_state_publisher or joint_state_publisher_gui
start_joint_state_publisher_gui_cmd = Node(
package='joint_state_publisher_gui',
executable='joint_state_publisher_gui',
name='joint_state_publisher_gui',
parameters=[{'use_sim_time': use_sim_time}],
condition=IfCondition(jsp_gui))
# Launch RViz
start_rviz_cmd = Node(
condition=IfCondition(use_rviz),
package='rviz2',
executable='rviz2',
output='screen',
arguments=['-d', rviz_config_file],
parameters=[{'use_sim_time': use_sim_time}])
# Create the launch description and populate
ld = LaunchDescription(ARGUMENTS)
# Declare the launch options
ld.add_action(declare_jsp_gui_cmd)
ld.add_action(declare_rviz_config_file_cmd)
ld.add_action(declare_urdf_model_path_cmd)
ld.add_action(declare_use_rviz_cmd)
ld.add_action(declare_use_sim_time_cmd)
# Add any actions
ld.add_action(start_joint_state_publisher_cmd)
ld.add_action(start_joint_state_publisher_gui_cmd)
ld.add_action(start_robot_state_publisher_cmd)
ld.add_action(start_rviz_cmd)
return ld
Edit CMakeLists.txt
Now we need to edit CMakeLists.txt for the mec_mobile_description package, so build system can find our new folders, launch and rviz.
cd ~/ros2_ws/src/mec_mobile/mec_mobile_description/
Add following code with VS Code to CMakeLists.txt:
# Copy necessary files to designated locations in the project
install (
DIRECTORY launch meshes urdf rviz
DESTINATION share/${PROJECT_NAME}
)
Note: The ARGUMENTS in launch.py defines the robot’s configurable parameters.
Launch File Explanation
robot_state_publisher.launch.py
Starting with the imports, we bring in essential ROS 2 launch utilities.
from launch import LaunchDescription
from launch.actions import DeclareLaunchArgument
from launch.conditions import IfCondition, UnlessCondition
The launch file’s core purpose is to arrange multiple nodes:
Robot State Publisher: Broadcasts the robot’s current pose
Joint State Publisher: Manages the robot’s joint positions
RViz: Provides the 3D visualization
The ARGUMENTS list defines the robot’s configurable parameters:
ARGUMENTS = [
DeclareLaunchArgument('prefix', default_value='',
description='Prefix for robot joints and links'),
DeclareLaunchArgument('add_world', default_value='true',
description='Whether to add world link'),
# ... other arguments
]
These arguments allow users to customize the robot’s configuration without changing the code – like using command-line switches to modify a program’s behavior.
The generate_launch_description() function is where the magic happens. First, it sets up the file paths:
This node takes the robot description and joint states and publishes the 3D posesof all robot links – like a real-time monitoring system for each part of the robot.
Finally, everything is assembled into a LaunchDescription and returned:
ld = LaunchDescription(ARGUMENTS)
# Add all the actions...
return ld
This launch file structure is common in ROS 2 applications, providing a clean way to start multiple nodes simultaneously.
That’s all.
ROS provides several tools to visualize various data like rqt and RViz. We can start the RViz with the rviz2 command, then we can add the Robot Model view, browse for our URDF file and type base_link as Fixed Frame etc.
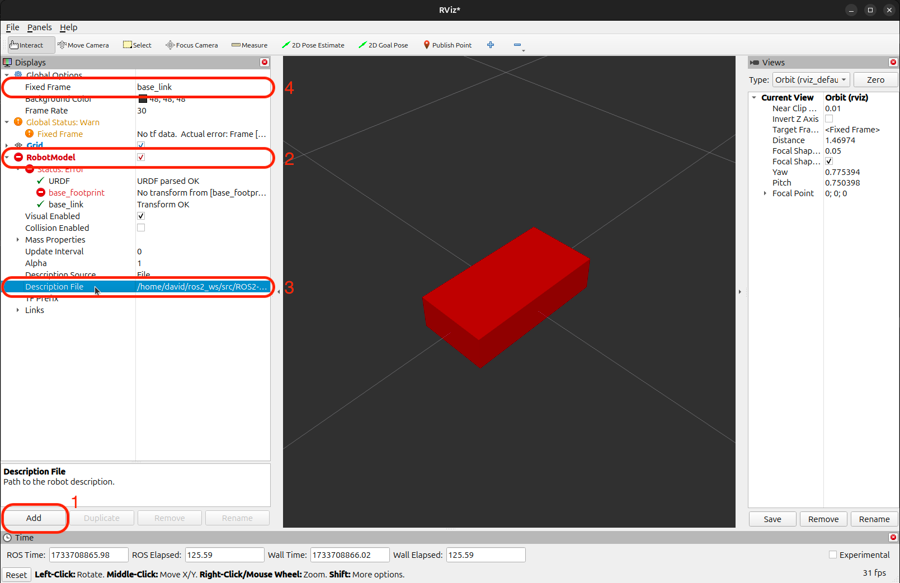
The source of urdf-tutorial package is . This package does exactly what we need, but it's not good to build up our tools onto it, so we can create our own launch file based on this package.
We can also create a custom launch file to launch a mobile robot in RViz as . Launch files in ROS2 allows you to start multiple nodes and set parameters with a single command.